

On this page
Connect from home or a laptop to faculty servers and computers on the university academic network.
The connection uses your password and a one-time code for multi-factor authentication (MFA), also called two-factor authentication (2FA).
Administrative staff connect through the university servers.
This connection is available only to staff and students in the Faculty of Exact Sciences.
These instructions do not cover researchers’ servers (such as NLP) or DSAI servers. Connect to those using the university VPN, following the instructions emailed to you.
Instructions for your home computer or laptop
- Remote connections are available to departmental and faculty servers.
- Academic staff can also connect to their computers on the university academic network after completing the preparations on the university computer.
- Before starting, you must know your username and password. Find information about your credentials here.
Setting up multi-factor authentication
Multi-factor authentication is required to connect to university servers.
Step A: Install an authenticator
Install an authentication app such as Microsoft Authenticator on your phone, from Google Play or the App Store. The app generates a one-time code to enter alongside your password when connecting.
Options for users with a kosher phone
You can install a similar application on your Windows computer:
- 2fast – TwoFactor Authenticator Supporting TOTP. Protecting the data file with a local password is strongly recommended.
- WinOTP Authenticator.
Install these applications through Microsoft Store. Two-factor authentication is mandatory: you cannot connect without an app on your phone or personal computer.
The code changes every 30 seconds.
Step B: Register for the faculty MFA service
- Request your personal key at mfar.esc.biu.ac.il.
- Enter your university short username only, without an email or domain suffix. Do not enter your ID number, first name, last name, or email address. This differs from the full username used for Bitvise later in this guide.
- The key will be emailed to you.

Step C: Link the app to the faculty authentication server
Open the authenticator installed in the previous step and add a new account by scanning the key’s QR code or entering the key itself, as received on the first line of the email.
Follow these steps (shown in the screenshots):
- Open the app and tap the three dots.
- Select Add account → Work or school account → Scan a QR code.
- Use the phone camera to scan the QR code from the email or registration screen in step B.
- A new entry labelled mfa@esc.biu.ac.il should appear.


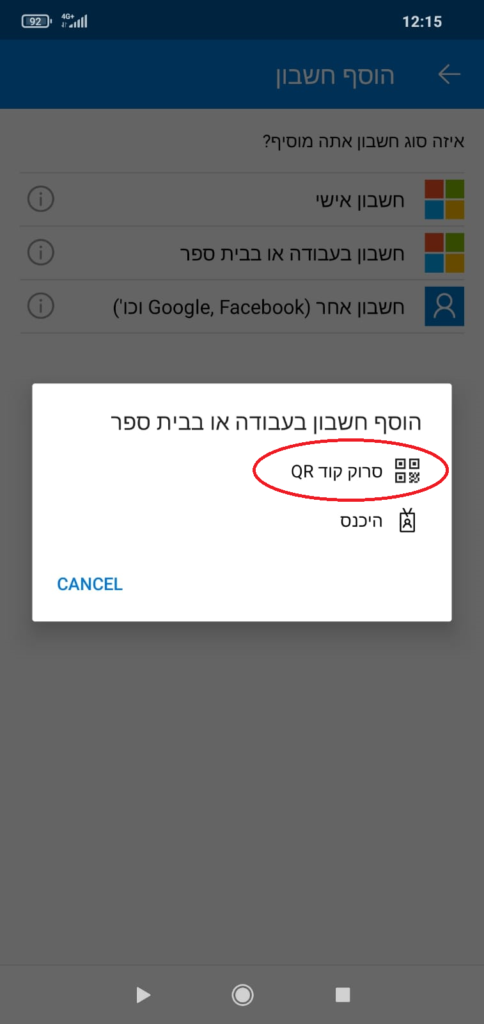
If you cannot scan the QR code, make sure it is displayed against a plain, dark background. Alternatively, enter the long key received from MFAR manually.

What next?
- The app provides a one-time code to use with your password when connecting.
- Select the faculty authentication account: mfa@esc.biu.ac.il.
- The code changes every 30 seconds.
Configuring the connection with Bitvise SSH Client
1. Download and install
Install Bitvise SSH Client. It provides a secure, encrypted connection between computers.
2. Load the connection profile
Download the Bitvise connection profile and save it on your computer. Open the file with Bitvise SSH Client. The profile includes the server vpn.esc.biu.ac.il and port 2222; enter your account details and configure the destination computer in the following steps.
3. Enter your account details in the Login tab
In Login, enter your account details:
- Username: your university username followed by
@ad.biu.ac.il, for exampleusername@ad.biu.ac.il. Replaceusernamewith your own username. - Password: your university password, also used to sign in to Inbar.

4. Configure the destination computer in the RDP tab
- Open RDP and click Destinations: 127.0.0.1 in the Remote Desktop area.
- Keep Use SSH login credentials selected to use the account details entered in Login.

- In Remote Desktop Destinations, select the
127.0.0.1row and click Edit. - Replace the destination with the network address or IP address of the university computer you want to connect to. Confirm the edit, then close the destination list with OK.

127.0.0.1 is a placeholder in the profile; replace it with the destination computer’s address. Remote Desktop (RDP) must be enabled on that computer. Prepare the university computer for remote access.
5. Save the connection profile on your desktop
Click Save profile as and save your configured profile on the desktop. Next time, open this saved file to load your settings.

6. Approve the security key
Click Log in. If Host Key Verification appears, compare the complete host-key fingerprint with the details provided by your departmental computing adviser. Click Accept and Save only after verifying the key. If the key is unfamiliar or has changed, contact the adviser before accepting it.

This completes the connection setup.
Connecting to the server
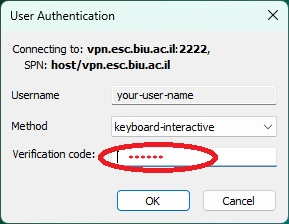
Open the profile saved in step 5 and click Log in if the connection does not start automatically. Enter your password if prompted. When a six-digit verification code is requested, open Microsoft Authenticator and select mfa@esc.biu.ac.il.
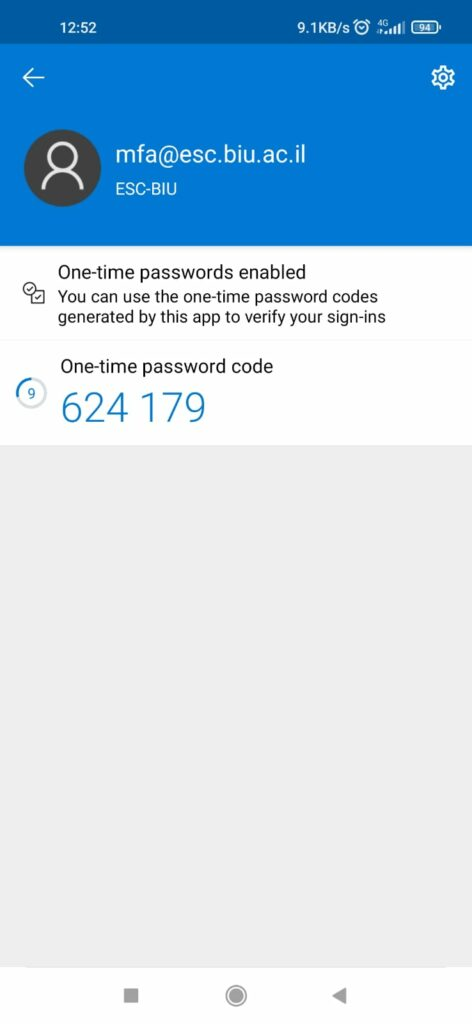
Enter the current code in the authentication prompt and confirm. If the code has changed, use the new code shown in the app.
If the remote desktop window does not open automatically after connecting, click New Remote Desktop in Bitvise.
Detailed instructions and other connection methods
- Windows-to-Windows connection using Bitvise SSH Client — recommended.
- Windows-to-Linux connection using MobaXterm — recommended for Mathematics and Computer Science.
- Connecting to Linux or Windows with the SSH command line.
One last step: Once everything works, permanently delete the email containing the QR code to protect your account and our systems. Also remove it from your deleted-items folder.
Bitvise instructions for first-time connections and host-key verification.
Good luck!